前提准备
- 一台电脑
- mingw运行环境
- vscode
- 耐心
- and so on
运行环境安装
下载完成之后应该是个压缩包,将其解压至自己喜欢的位置,注意,不建议将安装的文件夹mingw解压至有空格的目录,例如:Program Files (x86),将压缩包解压至没有空格的目录。
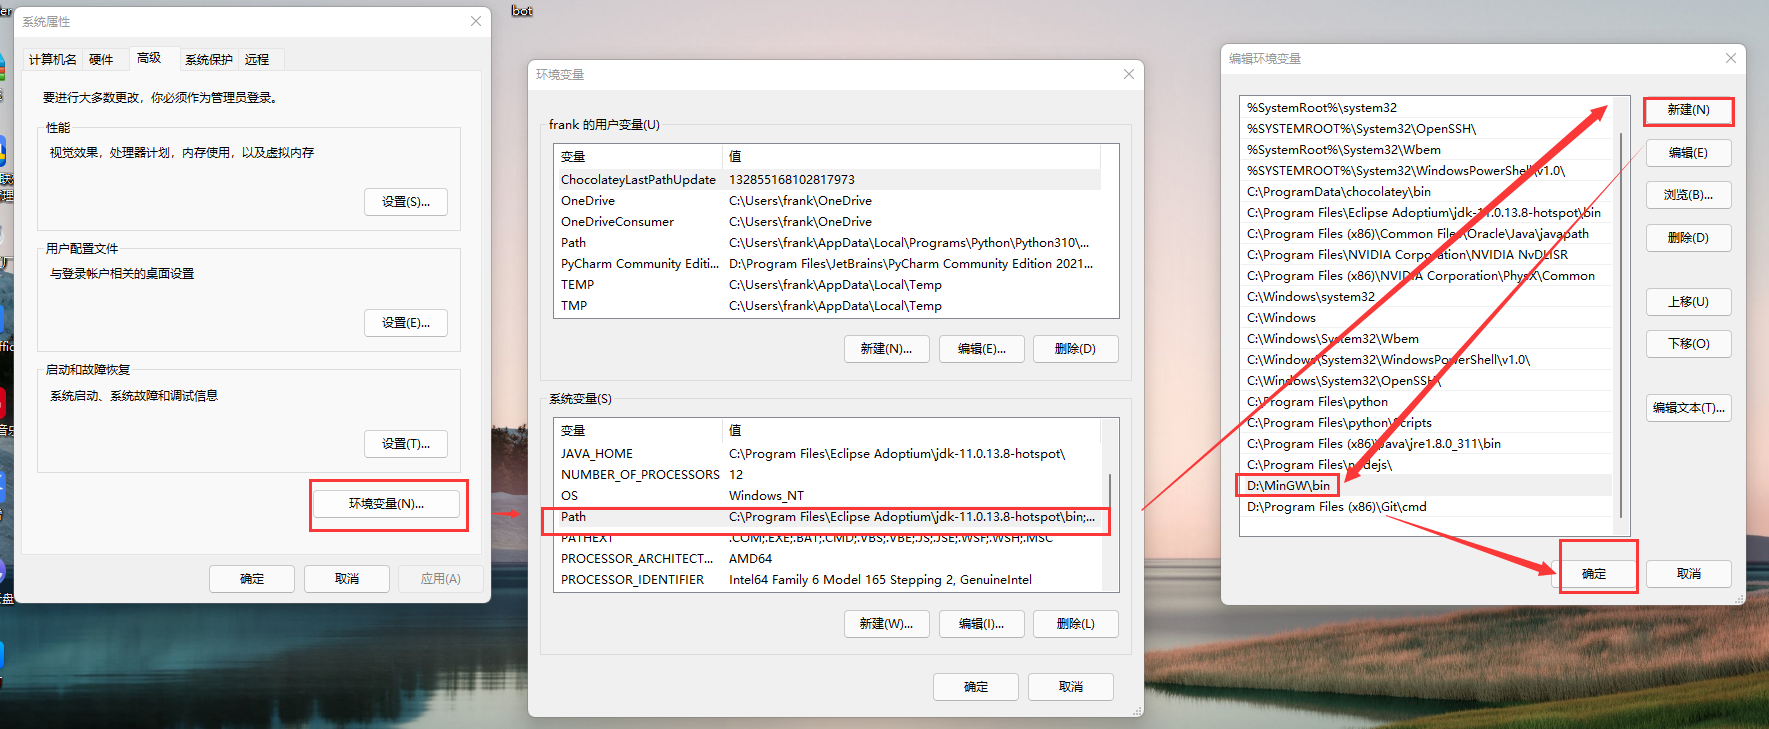
之后,回到桌面,此电脑 -> 属性 -> 高级系统设置。并按照下图所示,设置mingw环境变量:

- 环境变量 -> 系统变量-path -> 新建
- 将
../mingw/bin的目录加至环境变量中。
- 可以通过点击新建 -> 预览添加mingw目录。
之后,全部点击确定,关掉这些窗口。打开cmd(啥都可以,git bash也可以),输入gcc -v,出现以下则说明环境变量配置成功:
1
2
3
4
5
6
7
8
| $ gcc -v
Using built-in specs.
COLLECT_GCC=D:\\MinGW\\bin\\gcc.exe
COLLECT_LTO_WRAPPER=d:/mingw/bin/../libexec/gcc/mingw32/8.2.0/lto-wrapper.exe
Target: mingw32
Configured with: ../src/gcc-8.2.0/configure --build=x86_64-pc-linux-gnu --host=mingw32 --target=mingw32 --prefix=/mingw --disable-win32-registry --with-arch=i586 --with-tune=generic --enable-languages=c,c++,objc,obj-c++,fortran,ada --with-pkgversion='MinGW.org GCC-8.2.0-3' --with-gmp=/mingw --with-mpfr=/mingw --with-mpc=/mingw --enable-static --enable-shared --enable-threads --with-dwarf2 --disable-sjlj-exceptions --enable-version-specific-runtime-libs --with-libiconv-prefix=/mingw --with-libintl-prefix=/mingw --enable-libstdcxx-debug --with-isl=/mingw --enable-libgomp --disable-libvtv --enable-nls --disable-build-format-warnings
Thread model: win32
gcc version 8.2.0 (MinGW.org GCC-8.2.0-3)
|
visual stdio code下载安装
下载过程不过多阐述(
vscode 配置
c++
创建一个c++文件夹,用vscode打开此文件夹,随便创建一个cpp文件:
注意,文件夹名称不得为中文!
1
2
3
4
5
6
7
8
| #include <iostream>
using namespace std;
int main()
{
cout << "hello world!" << endl;
return 0;
}
|
按下F5,选择C++ (GDB/LLDB):
截图先欠着(
然后选择第一个:
截图先欠着(
之后,看着系统一顿操作,我们点击左下角打开控制台,切换到调试控制台,看到有 hello world,就配置成功啦!
截图先欠着(
但是,问题来了,它没有弹出我们想要的黑漆漆的窗口怎么办?没有内味!!!!!!!
欸,不要着急,我们可以看见有一个.vscode文件夹,里面已经生成了一个tasks.json,我们再创建一个launch.json:
1
2
3
4
5
6
7
8
9
10
11
12
13
14
15
16
17
18
19
20
21
22
23
24
25
26
27
28
29
| {
"version": "0.2.0",
"configurations": [
{
"name": "g++.exe - 生成和调试活动文件",
"type": "cppdbg",
"request": "launch",
"program": "${fileDirname}\\${fileBasenameNoExtension}.exe",
"args": [],
"stopAtEntry": false,
"cwd": "${fileDirname}",
"environment": [],
"externalConsole": true,
"MIMode": "gdb",
"miDebuggerPath": "D:\\MinGW\\bin\\gdb.exe",
"setupCommands": [
{
"description": "为 gdb 启用整齐打印",
"text": "-enable-pretty-printing",
"ignoreFailures": true
}
],
"preLaunchTask": "C/C++: g++.exe 生成活动文件"
}
]
}
|
再附上我自己自定义的settings.json文件,这个文件可以让你的设定在这个文件夹内有效,不影响vscode全局使用。
同理,一个文件夹可以创建一个.vscode文件夹来自定义局部设定,在使用git的时候,还可以通过.gitignore阻止.vscode的上传!
1
2
3
4
5
6
7
8
9
10
11
12
13
14
15
16
17
18
19
20
21
| {
"files.autoSave": "onFocusChange",
"editor.fontFamily": "Consolas, 'Courier New', monospace",
"editor.fontSize": 13,
"editor.fontWeight": "bold",
"editor.formatOnSave": true,
"editor.unicodeHighlight.allowedCharacters": {
"!": true,
"。": true,
":": true,
"(": true,
")": true,
",": true
},
"explorer.confirmDelete": false,
"explorer.confirmDragAndDrop": false,
"explorer.sortOrder": "type",
"files.associations": {
"ostream": "cpp"
},
}
|
那么。你有没有成功呢!!!
c
c大致上和C++相同,唯一差别就是在.vscode文件夹内配置的设置问题,c语言的则改为如下:
c_cpp_properties.json中的compilerPath则改为gcc.exe:
1
2
3
4
5
6
7
8
9
10
11
12
13
14
15
16
17
18
19
20
21
| {
"configurations": [
{
"name": "Win32",
"includePath": [
"${workspaceFolder}/**"
],
"defines": [
"_DEBUG",
"UNICODE",
"_UNICODE"
],
"windowsSdkVersion": "10.0.19041.0",
"compilerPath": "D:\\MinGW\\bin\\gcc.exe",
"cStandard": "c17",
"cppStandard": "c++17",
"intelliSenseMode": "${default}"
}
],
"version": 4
}
|
tasks.json中的command改为gcc.exe:
1
2
3
4
5
6
7
8
9
10
11
12
13
14
15
16
17
18
19
20
21
22
23
24
25
26
27
28
| {
"tasks": [
{
"type": "cppbuild",
"label": "C/C++: gcc.exe 生成活动文件",
"command": "D:\\MinGW\\bin\\g++.exe",
"args": [
"-fdiagnostics-color=always",
"-g",
"${file}",
"-o",
"${fileDirname}\\${fileBasenameNoExtension}.exe"
],
"options": {
"cwd": "${fileDirname}"
},
"problemMatcher": [
"$gcc"
],
"group": {
"kind": "build",
"isDefault": true
},
"detail": "调试器生成的任务。"
}
],
"version": "2.0.0"
}
|

 打开控制台,切换到